 Add Girt ( Modeling > press F2 >
  Miscellaneous Steel > " Girt ")
Tool summary :
Also see :
- New/2 2018: Girts (YouTube) (
 )
)
- Secondary Girt
- Sag Rod
page 1 | contents | F2 > miscellaneous steel > girt | girt edit window
 Quick instructions (also see the detailed instructions ) :

|
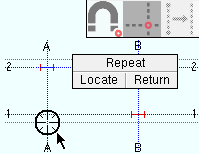
1 . Invoke Girt , then left-click ( Locate ) when the target ( |

|
2 . Left-click ( Locate ) when the point location target ( |

|
3 . On the Girt Edit window, enter the settings for the girt, then press " OK ." |

|
4 . The new girt appears. Right-click ( Return ) if you are done adding girts. Or you can left-click ( Locate ) or middle-click ( Repeat ) if you want to add another girt. |
page 1 | contents | F2 > miscellaneous steel > girt | girt edit window | top
 Detailed instructions (also see the quick instructions ) :
1 . Before adding a girt:
1a : Open a plan view that is at the appropriate elevation. Girts are usually best added using plan views so that the girt's work points are laid out at that elevation. To choose a view, consider the material type (wide flange, C channel, cold formed C or Z) and end elevations of the to-be-added girt, as in the following scenarios.
Scenario 1 : You are adding a wide flange, a C channel, or, possibly, a cold formed C or Z. Choose a plan view at the top of girt elevation of the to-be-added member. That way, when the girt's " Toe direction " is ' Down ', its web will be at the top of girt elevation and will be parallel to the plan view.
Scenario 2 : You are adding will be wide flange whose " Toe direction " is ' Down '. The center of its web will align with the plan view in which you add it. Choose a plan view at the elevation of the center of the web of the to-be-added wide flange girt.
Scenario 3 : You are adding a sloping girt. Add it in a plan view, then select appropriate Locators when you locate the girt's work points or, if necessary, adjust the " End elevation " of each end of the girt on its edit window in step 4.
Scenario 4 : You are adding a sloping girt. Instead of adding the girt in a plan view, you could input such a girt in an elevation view that aligns with the to-be-added girt's work points.
Scenario 5 : You need to lay out a perfectly vertical girt. It is recommended that you use secondary girt instead of this girt, since secondary girts are always perfectly vertical and are easier to add in that orientation.
1b : Lay out construction lines so that there are points of intersection ( INCL points) wherever you want to place the work points of the girt(s) you are adding. When you lay out construction lines, be aware of the following:
Tip: Reference the elevation (Z coordinate) reported on the X-Y-Z display while locating girt work points.
1c : Optionally set the toolbar icon or set User and Site Options > Modeling > " Automatically process after modeling operation " to a choice that will cause the girt you are adding to automatically have solids created and piecemarks applied when you press " OK " to close the Girt Edit window that opens in step 4.
2 . Add a girt using any one (1) of the following methods in Modeling :
Method 1 : Press F2 > check the box for "
Miscellaneous steel " > double-click " Girt ."
Methods 2, 3 & 4 : A Girt icon can be added to your toolbar (classic) or ribbon (lightning). The icon, keyboard shortcut or context menu command can be found in the group named ' Model -- Member '. For lightning, Customize Interface is used to configure ribbons, keyboards, the context menu and modes.
Method 5 : With Member Mode mouse bindings active, middle-click ( Add ). On the selection dialog that opens, double-click " Girt. "
3 . Locate - Repeat - Return mouse bindings become active, and you are prompted to locate the girt's two work points, starting with the left end. Do the following to locate the work points:
|
|
|
bindings |
3a : Select the appropriate Locate option. If you added intersecting construction lines in step 1b, you can use INCL .
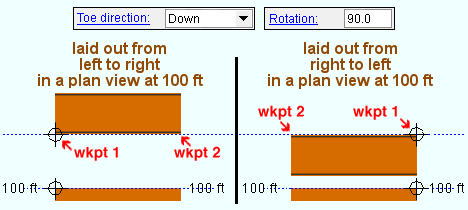
3b : Left-click ( Locate ) at two different on-screen positions to define the member line between those two points. The first work point you enter when you add the girt defines the left end of the member. Both points are represented as exact points after step 4, when the member is actually generated in the model.


The first point that you locate is identified by an origin symbol . The origin symbol also tells you which end is the member's left end. The following illustration of a C channel section shows the difference between locating the two points from left to right versus right to left.

If you Model > Member > Isolate > ... a girt, you will find that the member's MAIN VIEW shows the member's origin symbol (
) to be to your left. This is true even if the origin symbol for the member is to your right in a plan view. The MAIN VIEW in member isolation directly correlates to the main view of the girt's detail
Best practice when adding exterior girts in a plan view is to input them around the exterior in a consistent direction. For example, when you add work points clockwise around a structure, and the girt's " Rotation " is ' 90 ' (the default), their worklines correspond to the girt's outside edges.
4 . The Girt Edit window opens. On it are settings for the girt that you are adding.
4a : Enter a " Section size " to define whether the girt is a wide flange, a C channel, or, possibly, a cold formed C or Z.
4b : Choose a " Rotation " for the girt. If, for example, you input a C channel or a cold formed shape, choose ' Down ' for its " Toe direction ," and accept the default rotation of ' 90 ' degrees, the top face of its web will be in the work plane of your view and will be parallel to it.
4c : Choose a " Connection type " to select either angle, plate, or W Tee connection material, or a plain end.
4d : If you didn't choose a plain end in step 4c, choose a ' Top ' or ' Bottom ' " Location " for the connection material.
5 : Close the Girt Edit window.
Alternative 1 : Edit the settings as desired (see the note below), then press the " OK " button. Go to step 6.
Alternative 2 : Press the " Cancel " button to close this window. No girt will be added.
Note: The default settings on this window are those of the last girt added or edited in this session of Modeling . Even if all you do is double-click a girt and press " OK " on its edit window, its settings become the defaults for the next-added girt. You therefore only have to make changes to those settings which are different for this member.
6 . If User and Site Options > Modeling > " Process after modeling operation " is ' Process and create solids ', the new girt will have automatically undergone all phases of Process and Create Solids and will show up in a solid form . If that option is ' Process ' or ' Do nothing ', then the member line of the girt you just added shows up on screen in stick form , and you will have to Process and Create Solids in order to have the member piecemarked and able to be displayed in a solid form. Do one (1) of the following:
|
|
|
bindings |
Alternative 1 : Move the mouse pointer (
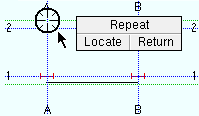
) and middle-click ( Repeat ) to lay out a girt just like the last one beginning at the point where the point location target (
) is at. The X, Y global axes location of the repeated member will begin from the located repeat point (where the target is at). The girt's Z location and other settings will be that of the last-added or last-edited girt.
Alternative 2 : Follow these instructions beginning with step 3 to add a girt with different settings than the one you just laid out.
Alternative 3 : Right-click ( Return ) if you are done adding rolled section members.
page 1 | contents | F2 > miscellaneous steel > girt | girt edit window | top


